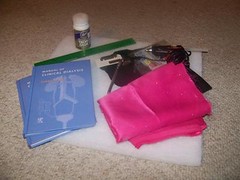
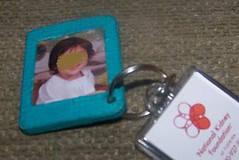
Thursday, March 15, 2012

Owl Themed Party Gift Bags


Last week I made owl themed party invitations for my daughter's seventh birthday. So, it was only a matter of time before I would need to make owl themed party favors. For this week's tutorial, I'll teach you how to make these really cute owl themed party gift bags.

To make one bag you will need:
Solid color card stock
Patterned card stock in colors complementary to your solid color card stock
A lunch size paper sack
White or cream colored card stock
Orange, brown or deep yellow card stock
An oval cutting system (or oval template) that will make an oval at least 6" long and another 4-5" long
A circle punch (or circle template) that will make a 1.5" diameter circle
A circle punch (or circle template) that will make a 1/2" diameter circle
A square punch (or square template) that will make a small square that is 3/4" long on each side
A square punch (or square template) that will make a small square that is 1 1/4" long on each side
Glue or glue stick

Using your 6" oval cutting system, cut one oval from the patterened card stock; this will be the owl's body. Paste the body on one side of the gift bag, doing your best to center the body. Cut a 4-5" oval from the coordinating solid color card stock. Fold the smaller oval in half lengthwise. Open the oval and cut along the fold. These will be the wings. Paste the wing pieces along each side of the body (apply the glue to the straight edge since the curved edge will likely hang over the side of the gift bag).

Punch two 1 1/4" squares from the yellow (orange or brown, whichever you choose) card stock and cut each in half to create triangles. Paste two triangles on the top of the body to create ears. Reserve one of the triangles for the brow and the other for the beak.


Punch two 3/4" squares out of the same card stock and cut each in half to create triangles. Cut each triangle in half again. Then cut the resulting triangles in half one more time. Each square will make 8 smaller triangles. Paste three of these smaller triangles on the bottom left side of the body, overlapping the triangles slightly, with center points facing toward the left. These are the left talons. Paste another three small triangles on the bottom right side of the body, overlapping slightly with center points facing right to form the right talons.

Punch two 1.5" diam. circles out of the white/cream card stock. Paste the circles below the ears to form the eyes. Punch two 1/2" diam. circles out of the solid color card stock (to match the wings) and paste these onto the white circles to form the irises. Now that you have eyes, paste one of your larger triangles (the brow piece) between the top of the eyes, with the center point facing downward. Paste the other triangle (the beak) between the bottom of the eyes, sliding the left and right points under the eyes and keeping the center point facing downward.

That's it! You have a cute gift bag for all those party favors! Again, this is more DIY than upcycle but I'm sure you can find sone ways to incorporate recyclables. This was a great way for me to use up scrapbook paper scraps that I've been accumulating for years. But you can also use book or magazine pages or fabric from old clothes. If you use thick card stock you can create a 3D type effect by applying glue only the center of the eye, ear and brow pieces. Embellish with glitter, beads or buttons or write a cute message on the bag. If you are creative, these bags will be a hoot!


Monday, March 5, 2012

Owl-Theme Cards


I love owls and so does my daughter.  So, this year, for her 7th birthday, we are having an owl-themed party.  While owls are quite popular these days, the owl-themed party supplies at our local store left a lot to be desired.  So, after going on Pinterest and seeing samples of many owl-themed cupcakes, cards and crafts, I decided we could make our own owl-themed invites.  Our invites came out so good - and this project was so easy - that I just had to write a tutorial for this blog.

To make one card, you will need:
Solid color card stock, in a color that you can write on so that your ink can be seen
Patterned card stock in colors complementary to your solid color card stock
White card stock
Black card stock
Orange, brown or deep yellow card stock
An oval cutting system (or oval template) that will make an oval at least 6" long
A circle punch (or circle template) that will make a circle the size of a half dollar
A circle punch (or circle template) that will make a circle the size of a dime
A square punch (or square template) that will make a small square (about 3/4" long on each side)
Glue or glue stick

Using your oval cutting system, cut one oval from the solid color card stock; this will be the owl's body.  Cut another oval from the patterned card stock.  Using your oval cutting system, cut out a small curved piece from the top (narrow end) of the solid colored oval body.  This will form the ears of the owl.  Also use your oval cutting system to cut out two long, narrow curved pieces from each long side of the patterned oval.  (See the photo.)  These long, narrow pieces will be the wings.  Paste the long, narrow, patterned wing pieces along each side of your solid color oval body. 

Punch two half-dollar sized circles out of your white card stock.  Punch two dime-sized circles out of your black card stock.  These will be used to form the eyes.  Paste the white circles side by side about a 1/2" below the top of your oval body, below the ears.  Paste one black circle on the top of each white circle, positioning the black circles where you like to get the desired "look".  Punch a square from your orange, brown or yellow card stock.  Cut the square in half to form two triangles.  We will use one triangle for the owl beak.  Paste the triangle upside down (point toward the bottom of the oval body), right below the eyes.   

Viola!  You are done.  In only a few short steps, you have a cute owl card that you can use for a variety of occasions.  We made ours for party invites, but these will also work well for thank you cards after the party.  If I'm in a crafting mood, maybe I'll make a few more for simple note cards. 

Now you probably think that this project is more DIY than upcycle.  But, this could easily become an upcycle project with a little imagination.  Try using book pages, gift wrap, gift bags or old school papers for a unique look.   Instead of cards, use these as bookmarks or in a child's mobile.  Instead of paper, try web-backed fabric for a fun t-shirt patch or blanket applique. The possibilities are endless.  I'm sure the rest of the owl-lovers are already dreaming up new ideas for this one.  Enjoy!


Monday, January 9, 2012

Heart shaped crayons


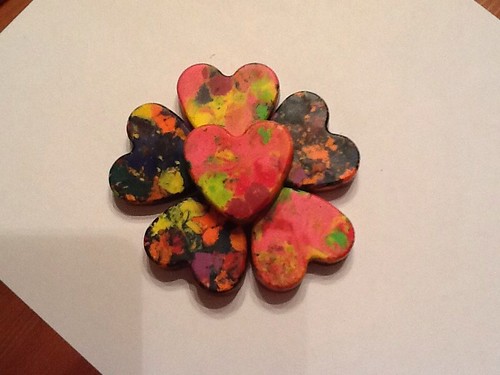
I've recently joined Pinterest and found many great ideas to recycle old crayons. My favorite idea is from Martha Stewart ... Heart shaped crayon. This is a very easy project using old crayons, a silicone baking tray and your oven. It only takes 30 minutes and the kids can help. That's my definition of a perfect project!

You can mix all colors together for multicolored crayons.  If you want, you can choose your crayon colors to suit a desired color scheme (e.g., use red, pink and white crayons for Valentine's Day themed crayons; red and green for Christmas crayons; or orange and black for Halloween).  You can also mold your crayons in a variety of shapes.  Your choices are only limited by the available selection of silicone molds at your local gourmet shop or craft store. 

You'll need the following:

Old crayons, peeled from their wrappers (select colors to suit your desired color scheme)
A self healing mat or cutting board
A chef's knife
A large bowl
A silicon mini muffin mold (mine makes 24 mini hearts)
A cookie sheet or sheet pan.

Preheat your oven to 150.  Place your silicon mold on top of a cookie sheet and set aside.  While the oven is heating, chop your old crayons into small bits using your chef's knife and self healing mat.  Transfer chopped crayons to a large bowl.  (You can separate your crayon bits by color if you want to make crayons in a variety of color combinations.) 

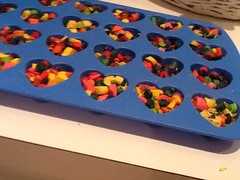
When you have chopped a fair amount, spoon the crayon bits into each well of your muffin mold (keeping the mold on top of the cookie sheet).  Be sure to add enough of each color to get your desired color combination.  (I went for a multicolored look and made sure every mold had a nice selection of colors.)  Fill each well to the top; otherwise your crayons may be too thin.
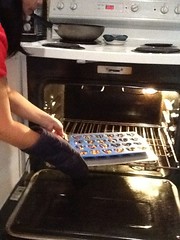
When you've filled the desired number of wells, put your mold in the oven.  (It is important to carry the mold to the oven on top of the cookie sheet, to keep your mold flat.  Otherwise, your crayons (and later the melted wax) may spill.  Bake the filled mold at 150 degrees for 15-20 minutes, until the crayons melt.   When the crayons are melted, remove your mold from the oven.  (Again, keep the mold on the cookie sheet!)  Set the mold aside to cool.  The mold cools pretty quickly. 

When completely cooled, remove the crayons from the mold by carefully pushing on the underside of each well.  If you are having difficulty removing the crayons, try cooling the mold in the freezer first for 20 minutes to an hour. 

These crayons are easy to make ... and economical!  These are great giveaways for any occasion.  The variety of colors you can use means you can give these all year round.  Even parents will think they're fun!

Saturday, May 21, 2011

Mini-Melon Bag


It's been a while since my last post, but that doesn't mean I have been short on ideas!  Today's Retrocraft uses one of my favorite recyclables - CDs!!!  This mini-handbag is perfect for little girls, especially as we move into the summer months.  What goes great with summer?  Watermelon, of course!

To get started, you will need the following:
A used CD (now that my taxes are filed, I used my TurboTax CD)
Scrap paper
Black felt tip pen or marker
Scissor
Utility knife
Ruler
Cardboard (like the kind you get from a cereal box)
Glue
Clothespins
Felt in green, white and pink
Wide nail
Decorative rope (I harvested mine from an old gift bag)
Velcro

Start by cutting your CD in half.  To figure out the location of the CD's midline, lay the CD on the top of your scrap paper and trace around the outer edge using your felt tip pen.  Cut out the circle using your scissor.  Fold the circle exactly in half, lining up the edges.  Lay the paper half circle on top of the CD, again, lining up the edges.  Using your felt tip pen, trace the straight edge of the paper to mark the midline of the CD.  Use your ruler and craft knife to separate the CD into 2 halves.  This will take several passes with your knife.  You may also need to bend the CD to crack it along the score line. 

Measure the arc of one of the CD halves.  Make note of the measurement.  Cut a strip of cardboard whose length is equal the measurement you've just taken; the width will be two inches.  Draw a line along the length of the cardboard that is 1/2" from the left edge.  Draw a similar line along 1/2" from the right edge.  Using the back edge of your utility knife blade, score each line to make it easy to fold.  Fold each edge toward the center of the cardboard length.  Using your scissor, cut along both edges every 1/2" (see photo.)


Working with one edge of the cardboard, apply glue to the first few "tabs" you have just created.  Position the cardboard around the arc of one of the CD halves.  Adhere the "tabs" and use a clothespin to hold the tabs in place.  Apply glue to the last few tabs along the same edge and adhere those tabs to the CD.  Again, use a clothespin to hold the tabs in place.  Allow the glue to adhere for a few minutes and then begin to apply glue to the tabs along the center of the strip.  As you apply the glue to each tab, adhere the tab to the CD.  (Try to use a fast drying glue.  You may have to hold each tab down for a minute for it to adhere well. 

While you allow the glue to dry, place the other CD half along one edge of the green felt.  Trace its shape using your felt tip pen.  Reposition the CD on the felt and trace its shape again.  Repeat with the white felt. Trace 4 halves on the pink felt.  Cut the halves out of each piece of felt.  Be sure to cut inside of the marker lines you've drawn so that your felt pieces do not have any traces of ink.  Also cut a strip of pink felt 1" wide and as long as your length of cardboard.

Turn back to the CD half you were working with earlier.  Glue one of the pink halves to the inside of the CD half.  Also glue the pink strip to the inside of your cardboard length.  Glue another one of the pink halves to the other CD half.  Align this second CD half with the unworked edge of the cardboard length, felt side facing inward.  Apply glue to the first and last tabs and adhere the tabs to the CD as you did before.  When those are affixed, continue to adhere the other tabs.  Allow everything to dry.

When dry, adhere the green halves to the outside of the bag.  Cut a length of green felt that is slightly wider than 1" and 1/2" longer than the length of the cardboard.  Center and glue the strip along the outside edge of the bag.  Trim the corners at each end, turn the ends inward and glue in place.  Use clothespins to hold the glued ends until the glue dries.  Cut 1/4" off of the straight edge of each half of white felt.  Glue each in place to the outside of the bag lining up the straight edges.  Glue the pink halves in place over the white halves, making sure not to overlap the white completely so that some of the white "rind" shows.  Turn the straight edges of the pink felt under and glue in place; use clothespins to hold in place until the glue dries.  While the glue is drying, use the felt tip marker to draw "seeds" on the pink felt on the one side of the bag. 

Mark a spot on the green felt covered cardboard strip, about 1" from one end, centering the spot 1/2" from each edge.  Do the same 1" from the other end.  Bore a hole at each spot, first using your craft knife and then using your wide nail.  Thread each end of your rope through the holes.  (The holes should not be wider than the width of the rope.)  Once you've passed your rope through each hole, tightly knot each end to keep the rope in place.  If you are concerned about the knot coming undone, you might be able to burn the knot to using a match to "seal" the knot.  Be careful not to burn the bag you've just made.

Next, using the half circle you template created from the scrap paper, trace a half circle on the remaining piece of pink felt.  Flip the template and position it 1" apart from the half circle you just drew.  Trace the template.  Draw lines to join the two halves you just drew to create an oblong and cut out the oblong piece.  Align the oblong piece on top of the "seedless" pink half of the bag and glue in place.  The oblong piece will now fold over the open section of the bag to create a flap.  Use your marker to draw seeds on the outside of the oblong piece.  Use a small piece of velcro to create a closure for the flap. 

Viola!  You are done and your little princess has a great new mini-bag to take on summer vacation.  The bag is small and isn't designed to hold alot but it can certainly hold crayons!


Sunday, March 27, 2011

Magnet photo frame


For my first blog post of 2011 (sorry for such a long absence!), I'm posting a fairly easy craft project.  I actually completed this project months ago, after wondering what to do with all of those sheet magnets covering my refrigerator.  On the same day, my daughter's school photos arrived home in her backpack.  With that, my idea was born. 

Today's project is a simple magnet photo frame, made from a hotel key card, generic card sized magnet, a small photo and glue!  You'll also need a razor or craft knife, a ruler and a marker.

To get started, measure the photo you will use for your project.  The photo should not be larger than the key card.  Ideally, it should be a bit smaller. 


After measuring the photo, draw a box on the back of the key card, just smaller than the size of your photo.  Use your ruler and marker to draw straight lines.  As you draw, center the box on the back of the key card.  After you've drawn your box, carefully cut the box out of the center of the key card by scoring the lines with your craft knife.  You'll need a very sharp knife.  You'll also need to make several passes before you cut through the plastic.  Use your ruler to keep your score lines straight, at least for the first few passes.  Remove the center once cut out and hold frame aside while you complete the next step. 

Measure a magnet sheet or card and cut so that its dimensions match those of the key card.  You will cover the back of the key card & photo with the magnet. 

Apply glue to the back of your reserved key card frame.  Once glued, carefully center your photo (image side down) over the back of the frame.  When your photo is place, gently add glue to the back of the photo.  Be careful that the photo does not move as you apply the glue.


Then cover the back of the photo and key card with the magnet (magnet side facing up).  Clip card and magnet together until glue is dry.  When the glue is dry, your photo frame is ready to be enjoyed!


Some other easy things to do with magnet cards?  Cover the printed side of the magnet with a thin layer of glue and cover it with a remnant piece of wrapping paper.  Lay a heavy book on the covered magnet so that the paper adheres completely to the magnet while the glue dries.  When the glue is dry, cut the covered magnet into a desired shape.  I used a Sizzix die-cut crafting machine to cut the magnet sheets into letters.  My daughter cut out the letters of her name and embellished the letters with glitter for a special touch.  We use her name letters to hang her art work or school papers on our refrigerator. 


Tuesday, November 2, 2010

Clutch-Style Handbag

Clutch (14)
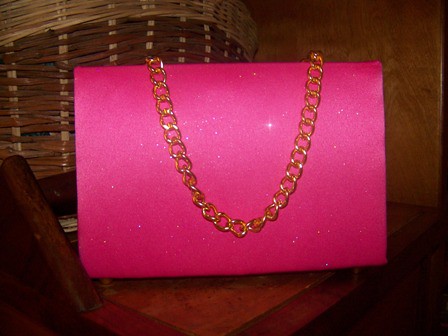
Handbags are one of my passions.  Over the years, I’ve amassed quite a collection.  So, it was only a matter of time that I would start a RETROCRAFT handbag project.  To be honest, the inspiration for this project jumped out at me while perusing other recycle craft blogs and sites.  One of those blogs featured a photo of a child’s purse made from the cover of a classic children’s story.  I liked the idea of transforming a book into a bag but decided to take the craft one step further.  The inspiration piece was clearly made from a book cover and ribbon.  In conceiving my project, I decided that I did not want the recyclable to be so obvious.  The idea was to make a bag that would not be discernible as a recycle craft but would appear like any other off the rack evening bag.  The first attempt did not turn out as I had hoped but the second attempt was a smashing success.  Hopefully, you will think so too! 

Clutch (1)To get started you will need:
One hardcover book with at least a 2” wide spine
(my books had 3/4" spines so I cut out the spine, cut out a 2" wide piece from a spare book cover and taped it into place)
A craft knife
Wide masking tape
A hot glue gun and several glue sticks
A strong 2-part magnetic closure (I harvested mine from an old magnetic name tag)
Glue
Craft foam for fabric art or cotton batting
Clothespins or binder clips
Decorative fabric (enough to cover the outside of the book, with a 1” edge on all sides, plus more for the sides of the handbag)
Felt (enough to cover the inside of the book cover)
Handbag feet (optional)
A chain, ribbon or other recyclable that can be used as a strap and additional ribbon or loops that can be used to attach the strap to the handbag (optional)
A cardboard box
A ruler

1.  Carefully remove all pages from the book using your craft knife.  Recycle the pages and retain the book cover.  Fortify the edges of the spine with wide masking tape on both sides of the book cover if needed.

2.  Using hot glue, affix one part of the magnetic closure to the inside edge of the front cover. Make sure it is centered along the edge.  Affix the other part of the magnetic closure to the inside edge of the back cover, centering the same along the edge.  When the book cover is closed, the pieces should meet and have a strong bond.

Clutch (5)3.  Lay the book cover flat, with the outside image facing up.  Spread a thin layer of glue over the outside image of the book cover, covering the image almost entirely.

Clutch (7)4.  Cut a very thin piece of craft foam or batting to size.  Lay the foam on top of the glued book cover surface; foam should not overlap the edges of the book cover.   Using the clothespins or binder clips, clip the foam to the book cover.  Then slowly close the book cover so that the pieces of the magnetic closure meet.  Allow the glue to dry.

Clutch (8)5.  Cut fabric so that it will completely cover the foam, making sure that there will be an extra 1” of fabric around all sides.   Lay the fabric, wrong side up on a work surface.  Lay the book cover, foam side down, centering the same on top of the fabric.  Using your hot glue gun, fold the corners of the fabric over the corners of the book cover and adhere with hot glue.  Do not pull to tightly.  You will need a slight amount of give so that the book cover can still close.


6.  After adhering all corners, begins to fold the edges of the fabric over the edges of the book cover and adhere with hot glue.  Again, do not pull tightly but make sure the fabric is not too loose.

7.  Cut felt to cover the inside faces of the book cover.  Use separate pieces for the inside front cover, spine and inside back cover.  The felt should be ¼” smaller on all sides than the area to be covered.  Adhere the felt to each section using hot glue. 

ClutchOptional steps:  If you will add a chain or other strap, any loops that will be used to attach the strap to the bag can be affixed before adhering the felt.  Consider placing the loops so that it can be concealed by the felt.   Keep in mind you may need to attach the strap in the process of attaching the loops.  If you want to add feet to your handbag, you should also do so before adhering the felt.  This may require you to bore holes through the inside face of the spine.  I used my craft knife and a large nail for this step, being careful when poking through the foam and fabric on the opposite side.   Attach the feet according to the instructions. 

8.  Open the cardboard box to lay the cardboard flat.  Using your craft knife and ruler, cut two pieces of cardboard.  The width of each piece should be approximately the same as the width of the spine of the book cover.  The length of each piece should be approximately ¾” shorter than the width of the front flap of the book cover. 


9.  Lay each cardboard piece, blank side facing up.  Using the back edge of your craft knife or a fork, score straight lines down the length of each cardboard piece ¼” from both edges.  Score a straight line across the width of each cardboard piece ¼” from the bottom edge.  Cut out the corners where the scorelines meet.  Fold each cardboard piece along the score lines, turning the scored edges toward the back of each piece. 

Clutch (2) 10.  Lay each cardboard piece flat again, blank side facing up.  Find the center of the top width of each cardboard piece.  Score a line from the center to the opposite corners of the piece (at the bottom width, where you cut away the corners).  Fold the piece along these new scorelines, folding up (toward you and away from your work surface).

Clutch (4)11.  Lay each cardboard piece flat again, blank side facing up.  Cut two pieces of fabric to cover the blank side of the cardboard piece, making sure you will have an excess edge of ½” on all sides.  Spread a layer of glue over the blank side of each cardboard piece.  Center the fabric over the cardboard pieces and adhere, making sure that the fabric is smooth and free of air bubbles.  Let sit for a few minutes.  While the glue is not completely dry.  Fold the fabric covered pieces along each score line in the same manner as instructed in steps 9 and 10. Make sure the fabric stays smooth against the cardboard and use clothespins or binder clips to maintain folds.  Allow each piece to dry.

Clutch (6)12.  When the glue is dry, lay each cardboard piece flat, fabric side down on your work surface.  Turn the excess fabric over the edges and glue down with hot glue.  Make sure edges and corners are covered making sure that excess fabric is clipped away to avoid clumping.  Cut felt to cover the uncovered faces of the cardboard pieces, centering the same and making sure the felt does not overlap the folds (other than the two diagonal folds through the center of each piece).  Fold each cardboard piece along the score lines.  

Clutch (10)
13.  Apply hot glue to the bottom edge of one cardboard piece, along the ¼” fold.  Adhere to one edge of the spine of the book cover so that fabric faces outward and felt faces inward.  Repeat with the other cardboard piece. 

Clutch (12)14.  Return to the first piece and apply hot glue along one of the remaining ¼” folds.  Fold one flap of the book cover upward to meet this glued edge and clip together to adhere.  Repeat with the other cardboard piece making sure that you apply hot glue to the fold that will meet up with the flap of the book cover that is folded upward.    Return to the first piece and repeat with the last ¼” fold.  Then do the same with the other piece. 

Once you complete step 14 and all glue is completely dry, make sure that you can close your new clutch so that the magnetic closure works properly and stays shut unless gently pulled apart.  If the magnetic closure will not remain shut you may have one of two problems:  either the fabric wrapped around the book cover is too tight or the cardboard pieces you cut in step 8 are too long.  They should not meet the opening of the clutch but should start at least 1” below the opening.  Because this craft does require the use of hot glue, it is not appropriate for young children.  The project is complex and requires pre-planning and organization.  So, be sure you’ve gathered all your materials before starting.  I recommend also that you read the instructions several times and carefully examine the photographs.  Have questions?  Just post a comment!  Happy crafting! 

Tuesday, October 26, 2010

Photo Key Fob

Key Fob 022


Continuing on last week’s challenge theme, I chose used gift cards to be the subject of this week’s RETROCRAFT project.  All week long, I considered different ideas to incorporate gift cards.  I initially considered making wallet sized picture frames out of my old gift cards.  But a last minute change of plans transformed my picture frames into photo key fobs.  A few years ago, my son’s school photos included laminated photo key tags that I proudly display on my key chain.  Going through my keys, I realized that my son’s photo was several years old.  My creative light bulb went off at that moment and my new idea was born. 

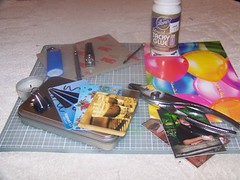
To get started you will need:
Key Fob 001
2 used gift cards or hotel card keys
A ruler
A craft knife
Pliers
Nail clippers
Fine grit sandpaper
Envelope with a clear window or ziplock bag
Photos
Glue
Craft paper
A ¼” wide nail
A candle or tea light
A lighter to ligth the candle
4 medium binder clips or clothespins
Marker or pen
A key ring

Key Fob 006Key Fob 0021.  Measure the length of one gift card and determine the center.  Cut the gift card in half using your craft knife and ruler (as a straight edge).  You will need to make several passes with your craft knife.  After making several passes, you can fold the gift card along the score line to snap it in half.  After breaking the gift card in half, match the uncut edges and confirm that each half is the exact size.  (It might help to clip the halves together.)  If necessary, trim the wider half to match the other.  If you’d like to snap off any excess, it might help to use pliers to hold onto the excess edge.

2.  Cut the other gift card in half just as you did in step 1.  Take one half of this second gift card and size it with the halves you cut in step 1, in the same manner described in step 1.  (The other half can be retained to make a second key fob or can be recycled.)

3.  Round the square edges of these gift card halves.  Using a nail cutter is the best way to do this.  Again, make sure the rounded edges of the gift card halves match.

4.  Use the sandpaper to clean and smooth the cut edges of each gift card half.  Stack the three (3) halves and make sure all match. Mark the outside face of the half that is on the top of the stack and mark the outside face of the half that is on the bottom of the stack.  These will be the “right” sides for future reference. 

5.  Take the top gift card half from the stack and cut a square window into the center using your craft knife and straight edge.  When you cut the window, make sure you leave a ½” space at the bottom of the half.  You will need this space to create the hole for the fob.  It will take a number of passes with the craft knife to cut the window.  The sharper your craft knife blade, the better.  As you cut the window, make sure that you are still able to identify the right and wrong sides of the card half.  After window is cut, recycle the center portion and use the sandpaper to smooth the edges.  Be sure to remember that this gift card half was the top of your stack.

6.  Repeat step 5 with the gift card half that is at the bottom of the stack.   Be sure to remember that this gift card half was at the bottom of your stack.

Key Fob 0167.  Cut the window from an envelope into sections that will adequately cover the windows that you cut into the gift card halves.  (If you don’t have an envelope window, you can also cut the clear portion a ziplock bag.  With the right side of each gift card half facing downward on your work surface, put a thin line of glue around the edge of the gift card windows.  Adhere each section of envelope window to each gift card half.

8.  Cut your photos to size so that your desired image will show through each gift card window.  Using the gift card that was in the center of the stack you put together in step 4 (the one that does not have a window), glue your photos to each side.  When placing the photos, keep in mind that when you stack the gift cards halves again, the photos should show throw the windows.

Key Fob 019Key Fob 020
9.  Place the “top” gift card from step 5 on a well protected work surface, right side down.  Holding the nail with pliers, heat the 1” tip of the nail in the flame of your candle.  After heating for 1 minute, use the heated nail to bore a hole in the corner of the top gift card half.  Be especially careful with the nail because it will be hot; be sure that you hold it with the pliers while it is heated.  It is a good idea to keep a cup of cold water close by.  You can drop the nail into the water to cool it quickly.  Use your craft knife to clean the edges of the whole and remove any excess plastic.  On both sides of the card, you want to make sure the area around the hole is flat and not raised.

10.  Match the photo gift card half from step 8 with the top gift card half from step 9 (right side up).  Clip together with binder clip or clothespin.  Using a pen or marker, mark the position of the hole so that you know where to bore the hole into the photo gift card half.  Follow step 9 with the photo gift card half.  (Make sure the photos you adhered to this gift card half are cut so that the area where the hole will be bored is not covered by any part of the photos.)

11.  Match the top gift card half from step 9 with the bottom gift card half from step 6, matching wrong sides to wrong sides.  Again, using a pen or marker, mark the position of the hole so that you know where to bore the hole through this third gift card half.  Follow step 9 with the bottom gift card half.

Key Fob 01112.  Apply a thin layer of glue to the right sides of the top and bottom gift card halves from steps 9 and 11.  Adhere the right sides of these gift card halves to the wrong side of your craft paper and let dry completely.

13.  When the glue is dry, carefully cut the excess craft paper away from the gift card halves.  Cut the craft paper away from the windows as well.  If you do not wait until the glue is dry, the paper may become jagged as you cut.  Using your craft knife and/or the cold nail, bore holes into the craft paper to matcht the holes you made into the gift card halves.  Try to cut any excess paper away from the holes. 

Key Fob 02114.  Stack the gift card halves to make your fob.  The paper should be on the outside faces, the photos should show through the windows and the holes should match up.  Glue the cards together and clip together using the binder clips or clothespins.  Let dry completely.

15.  Cut a strip ¼” wide at least 10” long.  Glue the strip along the exposed edge of the newly formed fob.  Cut away any excess with your craft knife. 

16.  Apply a very thin layer of glue to the paper on the top face of the fob and the paper covered edges.  (Do not apply glue to the windows.)  Let dry thoroughly.  When the top face is dry, apply a very thin layer of glue to the paper on the bottom face of the fob and let dry throughly.  The glue in this step is meant to create a decoupage effect and a protective layer that will stiffen the paper.

17.  When completely dry, you can place your fob on your key ring!

TIPS:  Technically, you could make this craft with heavy cardboard.  However, I think that gift card plastic will be much more durable for every day use.  This craft can utilize old photos for which you might not otherwise have a use.  However, in lieu of photos, you can use clip art.  Before applying the glue in step 16, you could embellish the faces of the fob.  For example, you could use mini-alphabet stickers to spell the names of those people whose images are in the photos you have a selected.

Because of the use of the nail, candle and craft knife, this project is not appropriate for children.   But even without the help of my children, I had a lot of fun creating this week’s project.  It did take some time and I now need to replace my craft knife blade.  Nevertheless, it was fun to watch these gift cards transform into such a practical item!