
This week I approached my blog in a different way. Rather than conceive the project and determine what recyclables I could use to create my craft, I started first with the recyclable and challenged myself to come up with craft ideas. I’ve had a stack of old CDs piled up on my dresser for the last few months. I had no reason to keep them but no reason to toss them either. So, I asked myself, what could I do with CDs? After mulling around a number of ideas, the idea of a jewelry box sprang to mind. I was eager to get started, to see if my idea would really work. Thankfully, the model turned out better than I expected. It was so good, I made another! Believe it or not, these boxes are made out of CDs and a cereal box!
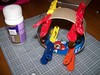
To get started, you will need:
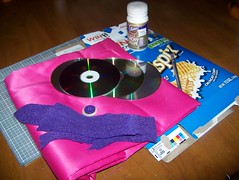
A cereal box or other similar cardboard box
A craft knife
A self-healing craft mat or thick cardboard
Glue
10-20 Clothes pins or binder clips
18” x 18” piece of fabric
Scissors
4 compact discs or DVDs
4 compact discs or DVDs
Additional fabric or felt for embellishments
Decorative buttons
Needle and thread (colored to coordinate with fabric or buttons)
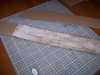
1. Open the cereal box (you may need to cut the box along one edge) and lay it flat on top of your self-healing mat. Using the craft knife and a straight edge, cut the cereal box to create two 13” lengths. You can determine the width of the lengths; the width will determine the height of the box. For this project, I cut each length to a 2” width. (If you cannot create one length of 13”, you can make one 13” length by taping together two 6 ½” lengths.)
2. From the remaining cereal box cardboard, cut two 12” lengths of ½” width. (Again, if you cannot create one length of 12”, you can make one 12” length by taping together two 6” lengths.)
 3. Apply glue to wrong side (the colored side) of one 13” length, making sure not to apply glue to the first 4” of the length. Place the other 13” length onto the glued portion of the other 13” length, matching wrong sides together. At this stage, 4” at each end will remain unglued. Clip the cardboard together using the clothes pins. Repeat with the 12” lengths.
4. Cut four 6” x 6” squares from the fabric. Starting with one CD, apply a thin layer of glue around the top edge of the unlabeled side of the CD. Lay the CD, labeled side up on the wrong side of a fabric square. Repeat with the remaining three CDs.
5. Starting with the first CD that was glued to the fabric, use the scissors to trim the fabric into a circle around the CD. When trimming, make sure there is ½” to 2/3” of excess fabric around the CD. Clip the excess fabric at every ½” around the CD to create a fringe. Repeat with the remaining three CDs.
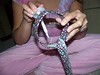
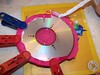 6. Start again with the first CD. Working in sections, apply glue to the fringe and fold the fringe over the edge of the CD. Clip with clothes pins as you work if needed. (You can probably use the clothes pins used in step 3 above.) Repeat with the remaining three CDs.
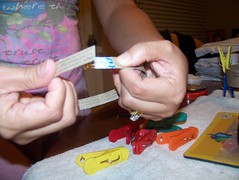
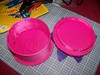
 7. Return to the cardboard lengths. Starting with the 13” length, apply glue to the 4” reserved at one end. Form a cylinder with the length, overlapping the newly glued section with the 4” at the other end. Use a clothes pin to hold the ends together. Repeat with the 12” length.
8. Cut the remaining fabric to create one 13 ¼” length. The width should be 1” wider than the width of the 13” length of cardboard you cut in step 1. For the model, I used a 3” width. Cut a second 13 ¼” length; the width should be 1/4” smaller in width than the width of the 13” length of cardboard you cut in step 1. For the model, I used a 1 ¾” width. (It is important that this second 13 ¼” length is cut straight.) Cut a second length of fabric, 12 ¼” long x 1” wide. Cut a second 12 ¼” length; the width should be just shy of ½”. (Again, it is important that this second 12 ¼” length is cut straight.)
9. Go back to the larger cardboard cylinder that you made in step 7. Center the 3” wide length you made in step 8 over the outer edge of the cylinder. Apply glue to the end of the 3” wide length to adhere it to the cylinder. Wrap the fabric around the cylinder. Apply glue to the other end of the fabric and adhere it to the cylinder, overlapping the fabric. There will be approximately ½” of excess fabric at each end of the cylinder. Repeat the same with the smaller cardboard cylinder, using the 1” wide strip of fabric.
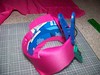 10. Returning to the larger fabric covered cylinder, clip the excess fabric at each end of the cylinder at every ½” to create a fringe. Working in sections, apply glue to the fringe and fold the fringe over the edge of the cylinder. Clip with clothes pins as you work. (You can probably use the clothes pins from step 6.) Repeat with the smaller cylinder.
 11. Return to the CDs. Take two CDs and glue the wrong sides together.
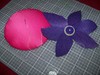
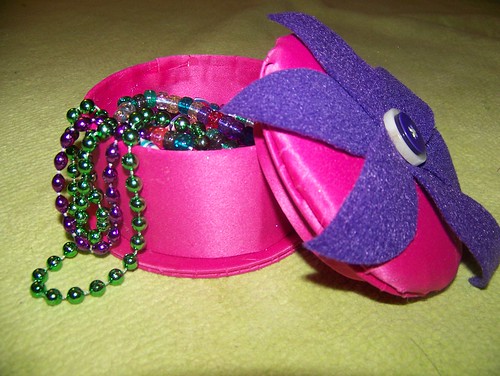
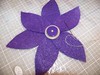 12. If desired, you can create an embellishment from other fabric or felt and sew onto the center of the right side of one of the remaining CDs. For this project, I made flower petals from purple felt and sewed them into a flower shape using coordinating buttons to anchor them in the center. I then sewed the flower onto the CD.
13. Glue the embellished CD onto the remaining CD, gluing the wrong sides together. This will be the top of your box.
 14. When the cylinders in step 10 are dry, lightly coat the inside with glue and cover the inside with the remaining fabric lengths you cut in step 8, using the wider length for the larger cylinder and the narrower length for the smaller cylinder.
15. Apply a line of glue to the edge of the larger cylinder and adhere the cylinder to the CDs you glued together in step 11, centering the cylinder over the CDs. To ensure a good bond, you can a lay book on top of the cylinder. This will be the bottom of your box. Do the same with the smaller cylinder, adhering it to the unembellished side of the CDs you glued together in step 13. This will form the lid of the box.
16. When dry, your box is ready to fill! The lid should fit snuggly onto the bottom of the box.
TIPS: If your fabric is wrinkled, be sure to iron it before use. You can created a tufted look for the box lid by adding a thin layer of foam or batting between the CD and fabric that will form the top of your box. I did this for both models I made. I also found that hot glue applied from the inside of the box and lid works best in step 15.
This craft is best done by an adult. A child can help with certain steps. My daughter helped with the gluing in step 6. However, the steps need to be followed precisely, making this craft very difficult for little ones. I suggest you review the steps and the photos a couple of times before starting with this craft to ensure that you are familiar with all the steps. This craft does take some time (it took me 1 ½ hours to complete each box) making it a perfect project for a lazy afternoon.
Enjoy!
How clever! And aren't we all always looking for something to do with all those discs we don't need or want? I have always saved mine because I was SURE there was *something* I could do with them. And now I know what it is! Thanks for this...very cool idea!
ReplyDelete